I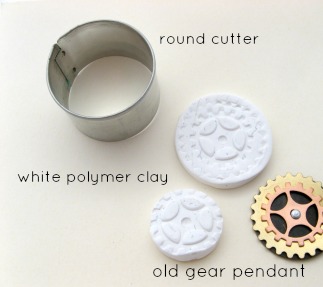 've been told more than once that you should only showcase your very best work online. Never show first drafts, incomplete projects, or anything that is less than your best work.
I can see the point: subpar work can mar your brand. But on the other hand, it's exactly that kind of imperfect work that helps you learn.
This is a long-winded way of explaining why I'm going to show you my quick polymer clay pendant that I made for the May Challenge for B'Sue Boutiques. (Deadline is at the end of the month; you still have time to enter and win a $50 gift certificate!) As is, it's not something I'd sell in my shop or even give as a gift; it isn't ready for prime time. But I did learn quite a bit which might be helpful if you try a similar project.
Tools & Materials
To create this pendant, I used white PREMO polymer clay, two sizes of round polymer clay cutters, an acrylic roller, acrylic paints, alcohol inks, and an old layered metal gear pendant that I made a couple of years ago. (The pendant is slightly bent, which is why isn't adorning a necklace.)
Tip 1: Polymer clay requires a very clean surface. It will pick up every tiny bit of dirt or dust. I like to work on a white ceramic tile because it's easy to clean.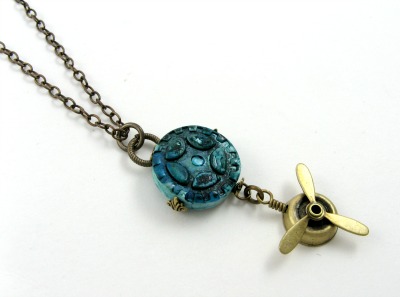
Tip 2: You can easily use rubber stamps to create texture on polymer clay, but for a more unique look, dig through your studio for items that might create unique impressions.
Making the Polymer Clay Gear
The process is very simple. You'll want to condition the clay, that is, soften and manipulate it until its easy to work with. Roll out a small piece with your acrylic roller. (Of course, if you have a pasta machine, you can use that.)
Next I pressed my pattern into the clay and then cut out the circles.
Tip 3: If the edges of the clay are rough after being cut, you can smooth them with your fingers.
After the clay bakes, let it cool. I used metallic teal acrylic paint for the first layer. Then I added some alcohol inks on top. (For the large gear at the bottom, I used black paint and gold Gilder's Paste.) I did not seal the piece (since I viewed it as a practice piece), but if you're making a "keeper," you'd definitely want to put a sealant over the paint and inks.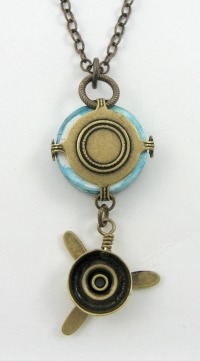 Finishing the Pendant
I inserted the small gear into a 24mm brass bezel. (The 4-prong bezels come in all sorts of metal finishes if brass isn't your thing.) Glue the polymer clay piece inside the bezel with a jeweler's glue such as E-6000. The prongs alone are not quite long enough to hold it in place. I wire wrapped a brass airplane propeller charm to the bottom of the bezel and added jump rings to the top to hold the chain.
If I were to make another version of this piece, I'd also finish the back. Customers almost always look at the back of a piece when considering a purchase. I think it's safe to say that if I showed this at a craft show as is, anyone who picked it u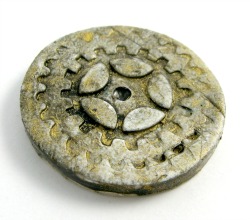 p would put it back down. It would look much more professional to have the back of the polymer clay finished without unpainted sections showing.
Final Thoughts
While I'd love to make a perfect project every time, it just isn't possible. This is especially true when working with a new material or technique. For me, polymer clay is one of those techniques that I use so rarely that every time feels like the first time. (The last time I worked with polymer clay was in 2010. It wasn't exactly a roaring success. See my blog post Why Polymer Clay Burns.)
So the next time you try something new, give yourself a break. We'd never expect anyone to sit down at a piano for the first time and play a flawless concerto, so why do we expect it in the jewelry world?
How to Make An Imperfect Polymer Clay Pendant
If you enjoyed this blog post, sign up to get new ones by email. It's free and fun! As a bonus, email subscribers will get her What to Read Next guide, a list of 30+ books she's enjoyed over the last few years. Thanks for reading!
Sign up here to get blog posts sent to your email: