I'm getting ready for a craft show at Northern Colorado Writers in Fort Collins, Colorado on December 4. I've been experimenting with making a few pendants for the show using ICE Resin (a 2-part epoxy). I love it! It's so clear and bubbles are few and far between. This isn't to say that it's been a problem-free experience. (What is?) Here are a few of the problems I had—and how to solve them:
 1. Pour s-l-o-w-l-y!
Somehow I thought the resin and hardener would flow more slowly out of the bottle and into the mixing cup. I poured way more than I needed and ending up making a full ounce of resin. An ounce isn't a lot if you are talking about lemonade on a hot summer day (or hot chai on a chilly day like today), but for resin, that's a lot of finished pieces. Which brings me to my next problem:
2. Have a back-up plan
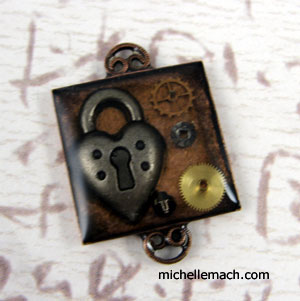
I had all my bezels prepared and waiting for the resin ahead of time. That was before I ended up pouring so much extra. You can't save the mixed resin and you only have a limited time to work with it before it starts to harden. The pendant shown here is one of the unplanned ones I made to use the extra resin. Bottle caps are also helpful to have on hand for this reason. Unfortunately, all the pieces—planned and unplanned—looked so pretty that I forgot this next rule:
3. Sleep on it
This resin dries so clearly that it's difficult to tell when it's set. I left a fingerprint on one piece! One great bit of advice I got from Sara Richardson at Lovestruck Jewelry: pour your resin shortly before you go to bed. You can check for bubbles within the first half hour or so and then go to sleep. This way, you're not tempted to touch the resin while it's trying to set. But if you do mess up like I did, don't worry because you can:
4. Try, try again
The cool thing about ICE resin is that it's self-healing, meaning that you can mix up another batch and paint it on top of the old one. No one will be the wiser.
What resin tips do you have?